Steps
- Application for connection.
All information required for connection — in one application - Access to the test environment.
Get access to the test environment and integrate under the supervision of S7 technicians - Hello world!
Set your software and make your first request! - Running your tests.
Test the S7 Agent API to prevent future problems - Signing of the contract of EDS.
Sign the contract electronically - Accessing Access to the production area environment.
Get access to the production environment and complete integration. - Maintenance.
Use the all of Complete integration and use the capabilities of the S7 Agent API 7 days after completing the applicationand stay tuned for a new features!
Target period — 7 working days
| Anchor | ||||
|---|---|---|---|---|
|
Test
- Endpoint: https://qa-gaia.s7.ru/agent-api/gaia
- WSDL v0.21: https://qa-gaia.s7.ru/agent-api/wsdl/0.21?wsdl
- WSDL v0.29: https://qa-gaia.s7.ru/agent-api/wsdl/0.29?wsdl
- WSDL v0.34: https://qa-gaia.s7.ru/agent-api/wsdl/0.34?wsdl
- WSDL v0.35: https://qa-gaia.s7.ru/agent-api/wsdl/0.35?wsdl
Production
- Endpoint: https://api.s7.ru/agent-api/gaia
- WSDL v0.21: https://api.s7.ru/agent-api/wsdl/0.21?wsdl
- WSDL v0.35: https://api.s7.ru/agent-api/wsdl/0.35?wsdl
Step 1: Application for connection
Contact to manager for your region and request them for an application from at vm@s7.ru;
 link to emails?
Fill the application form with link to your portal and send to S7 manager;
- S7 checks your form and initiate registration in our systems, include JIRA for communication with our technical support;
- Receive JIRA account credentials from S7.
Step 2: Access to the test environment
1. Receive JIRA account credentials from S7;2. Check your environment for OpenSSL and install additional software (required to create a request for SSL certificate):
| Panel | ||
|---|---|---|
| ||
Download the last binary version of OpenSSL at https://www.openssl.org/community/binaries.html and install software |
| Code Block | ||
|---|---|---|
| ||
sudo apt install openssl |
| Panel | ||
|---|---|---|
| ||
No action is required — already included in OS |
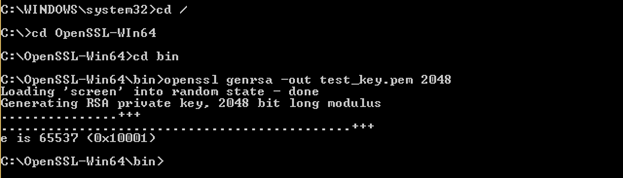
32. Use command line (as administrator) to create private key:
| Panel | ||
|---|---|---|
You have to replace ${clientkey} into understandable name using your local naming policies.
|
43. Create request for SSL certificate:
| Panel | ||
|---|---|---|
Replace ${clientcsr} into used name on previous step; You have to replace ${clientkey} and ${clientcsr} into understandable name using your local naming policies.
|
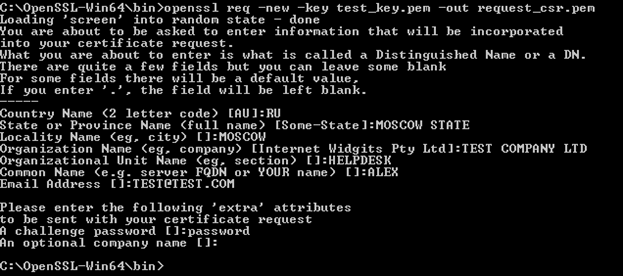
54. Fill details of request for SSL certificate:
| Panel |
|---|
Mandatory:
No need to specify:
|
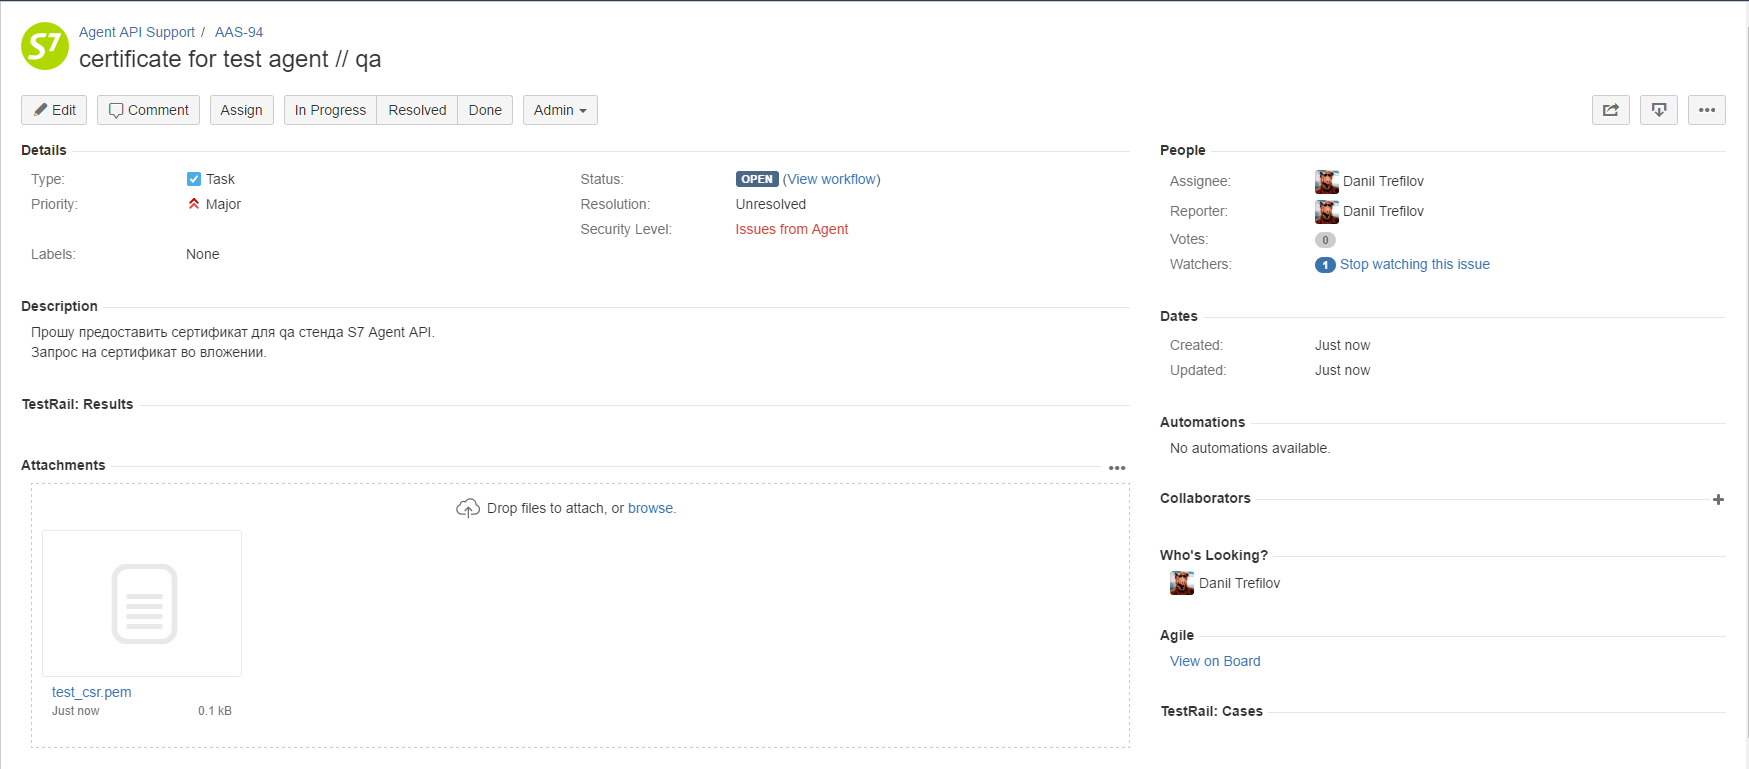
65. Create a new task with request of SSL certificate (request_csr) by JIRA
| Panel |
|---|
| Example of task:
Attach to task created private key (test_key) and request for SSL certificate (request_csr). |
76. Receive credentials for test environment from our technical support:
| Panel |
|---|
|
87. Import SSL certificate and create key store file:
| Panel | ||
|---|---|---|
Export Password – password for key sore file which will be requested while importing into test software
|

Step 3: Hello world!
1. If you using test software build in browser you have to import keys (or check your software's documentation):
| Panel | ||
|---|---|---|
| ||
| : Menu → Preferences → Advanced → ViewCertificates → Your Certificates → Import → Choose created key store file (*.p12) on previous step ; |
| Panel | ||
|---|---|---|
| ||
| : Settings → Advanced Settings → HTTPS/SSL → Import → Choose created key store file (*.p12) on previous step. |
2. For a better experience, we prefer to use SoapUI for testing:
| Panel |
|---|
Download the last binary version of SoapUI at https://www.soapui.org/downloads/soapui.html and install software |
3. Open SoapUI and create a new SOAP project: SoapUI → File → Preferences → New SOAP project
- Open SoapUI and create a new project: SOAP project
Open — SoapUI > File > Preferences > SSL Setting
3. For better experience we prefer to use SoapUI for test:
3. For better experience we prefer to use SoapUI for test:
3. For better experience we prefer to use SoapUI for test:
3. For better experience we prefer to use SoapUI for test:
- Create request
- Set BA for request
- Set SSL for request
- Set header for version
- Send — Hello world!
Mozilla Firefox > Menu > Preferences > Advanced > ViewCertificates > Your Certificates > Import > Выберите ${client}.p12
Google Chrome > Settings > Advanced Settings > HTTPS/SSL > Import > Выберите ${client}.p12
| Panel |
|---|
|
4. Assign created key store file for the project
| Panel |
|---|
|
5. Create new request and set basic authentication
| Panel |
|---|
|
6. Set assigned keystore
| Panel |
|---|
|
7. Set endpoint of test environment in the top of request window
8. Fill request teaxarea by example below and send it!
Excerpt Include Basic 1 Basic 1
9. If you have no results, try to check your connection to exclude the case of incorrect credentials before you contact to our technical support by JIRA.
| Panel |
|---|
|
Step 4: Running your tests
1. Choose one of available versions at test environment at the top of the page;
2. Use header's parameters for selected version (If the parameter is not defined, the last version will be used by default):
3. Read the API's documentation;
4. Try to execute the user story with the simplest flow and then other scenarios that you are interested with;
| Panel |
|---|
|
|
5. Give us feedback through your manager or our technical support by JIRA.
Step 5: Signing of the contract of EDS
- Ready to production environment? Notify your manager
- Катя Катя?
- Check Check basic flow? Review? Prod monitoring?
- Create online new validator without transactions history?
Step 6:
AccessingAccess to the production area
createCreate a new certificate for production environment (similar as for test environment but the new one — check Step 2 for more details):
- Create private key;
- Create request for SSL certificate;
- Fill details of request for SSL certificate;
- Create a new task with request of SSL certificate (request_csr) by JIRA;
- Receive credentials for production environment from our technical support:
- a SSL certificate (*.crt file);
- personal credentials for basic authentication (login and password);
- test access parameters for requests (XML block Party);
- Import SSL certificate and create key store file;
Step 7: Maintenance
- Choose one of available and tested versions at production environment at the top of the page;
- Use header's parameters for tested selected version (If the parameter is not defined, the last version will be used by default):
- send to JIRA
- recieve new BA and SSL and access parameters from support
- use headers for actual and tested version
- Try to use read operations to check your first bookings (read operation) and issued tickets (retrieveTicket) that they are okIf . If you do are still not still sure ask our sure, don't hesitate to reach out our technical support by JIRA.
- Don't forget to check:
- Release Notes for new versions of S7 Agent API;
- FAQ and for most common issues you can be faced with.
| Info |
|---|
If you still have any question, try to resolved resolve it with FAQ, documentation or ask our technical support by JIRA or email at api.support@s7.ru |