Steps
- Application for connection
All information required for connection — in one application - Access to the test environment
Get access to the test environment and integrate under the supervision of S7 technicians - Hello world!
Set your software and make your first request! - Running your tests
Test the S7 Agent API to prevent future problems - Signing of the contract of EDS
Sign the contract electronically - Access to production environment
Get access to the production environment and complete integration. - Maintenance
Use the all of capabilities of the S7 Agent API and stay tuned for a new features!
Target period — 7 working days
Environment
Test Production # Version Endpoint Endpoint 1 0.52 WSDL 2 up to refund&deleteTST&schedule&split&postsale refund&deleteTST&schedule 3 up to
Step 1: Application for connection
Contact to manager of your region and request for an application form at vm@s7.ru;
Fill in the application form with a link to your portal and send it to S7 manager;
- S7 checks your form and initiates registration in our systems, including JIRA for communication with our technical support;
- Receive JIRA account credentials from S7 and follow steps for connection to JIRA.
Step 2: Access to the test environment
1. Check your environment for OpenSSL and install additional software (required to create a request for SSL certificate):
Download the last binary version of OpenSSL at https://www.openssl.org/community/binaries.html and install software
sudo apt install openssl
No action is required — already included in OS
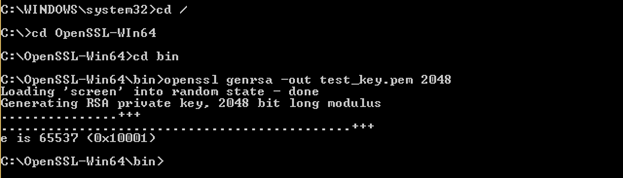
2. Use command line (as administrator) to create private key:
openssl genrsa -out ${clientkey}.pem 2048
You have to replace ${clientkey} into understandable name using your local naming policies.
3. Create request for SSL certificate:
openssl req -new -key ${clientkey}.pem -out ${clientcsr}.pem
Replace ${clientcsr} to the name used on previous step;
You have to replace ${clientkey} and ${clientcsr} into understandable name using your local naming policies.
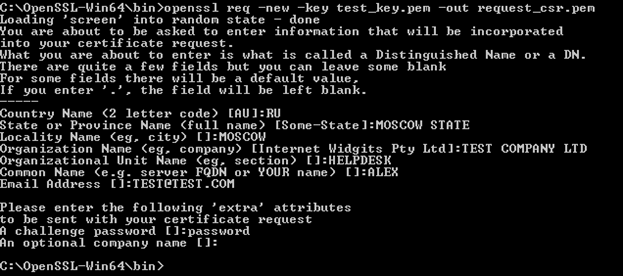
4. Fill in the details of the request for SSL certificate:
Mandatory:
- Country Name (2 letter code)
- State or Province Name
- Locality Name (eg, city)
- Organization Name (eg, company)
- Organizational Unit Name (eg, section)
- Common Name (your name or server's hostname)
No need to specify:
- A challenge password
- An optional company name
5. Create a new task with the request of SSL certificate (request_csr) by JIRA
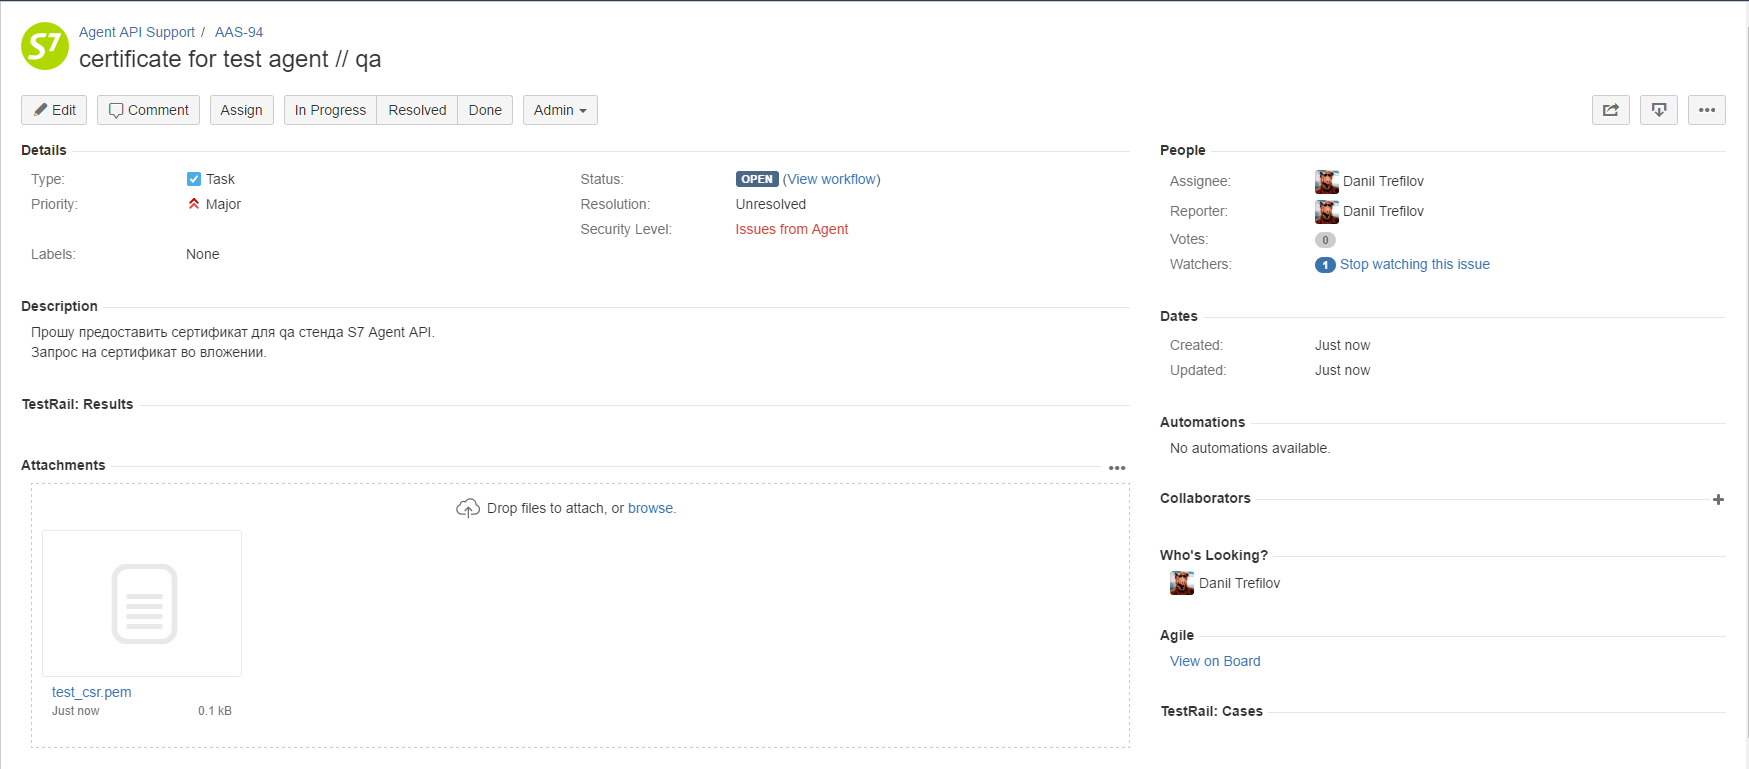
Attach to the task created request for SSL certificate (request_csr).
Check “Bin” (OpenSSL) folder for those files.
6. Receive credentials for test environment from our technical support:
- a SSL certificate (*.crt file)
- personal credentials for basic authentication (login and password)
- test access parameters for requests (XML block Party)
- test Client ID and Agent ID for testing shopping with 3D agreement
7. Import SSL certificate and create key store file:
openssl pkcs12 -export -in ${clientcert}.pem -inkey ${clientkey}.pem -out ${client}.p12 -name "${name}"
Export Password – password for key store file which will be requested while importing into test software

Step 3: Hello world!
1. If you are using test software build in browser you have to import keys (or check your software's documentation):
Menu → Preferences → Advanced → ViewCertificates → Your Certificates → Import → Choose created key store file (*.p12) on previous step
Settings → Advanced Settings → HTTPS/SSL → Import → Choose created key store file (*.p12) on previous step.
2. For a better experience, we prefer to use SoapUI for testing:
Download the last binary version of SoapUI at https://www.soapui.org/downloads/soapui.html and install software
3. Open SoapUI and create a new SOAP project
- SoapUI → File → Preferences → New SOAP project
- Check available versions at test environment at the top of the page;
- Copy relevant WSDL URL;
- Past in form, fill a project name and press OK.
4. Assign created key store file to the project
- Project → Show project view → WS-Security Configurations → Keystores;
- Click on "+" (Adds a new Keystore to this configuration);
- Set a path to p12-file and input the password;
![]() Do not use global settings (SoapUI → File → Preferences → SSL Setting) to save ability of using both environments without any additional setting changes
Do not use global settings (SoapUI → File → Preferences → SSL Setting) to save ability of using both environments without any additional setting changes
5. Create new request and set basic authentication
- Open tab "Auth" under request textarea;
- Select "Authorization" = "Basic";
- Input Username and Password (your received them from our technical support on previous step);
![]() You have to set it for all your requests
You have to set it for all your requests
6. Set assigned keystore
- Go to tab "TestRequest Properties" under the projects tree;
- Select imported p12-file in "SSL Keystore" parameter;
![]() You have to set it for all your requests
You have to set it for all your requests
7. Set the endpoint of test environment at the top of request window
8. Fill in the request textarea by an example described below and send it!
9. If you have no results, try to check your connection to exclude the case of incorrect credentials before you contact to our technical support by JIRA.
- Import key store file into the browser (see steps to set up browser above)
- Go to any URL from Environment section via browser
Step 4: Running your tests
1. Choose one of available versions at test environment at the top of the page;
2. Use header's parameters for selected version (If the parameter is not defined, the last version will be used by default):
3. Read the API's documentation;
4. Try to execute the user story with the simplest flow and then other scenarios that you are interested in;
- We are using actual schedule for flights but you may feel free to create bookings and issue tickets (please, note that some minor discrepancies between test and production results are still exist);
- No time limits for testing;
5. Give us a feedback through your manager or our technical support by JIRA;
6. Ready to production environment? Notify our technical support by JIRA for final testing under the supervision of our technologists.
Step 5: Signing of the contract of EDS
1. Contact with your account manager to sign a contract
2. Create a new validator (without transactions history) for our GDS to have ability to execute all basic shopping scenarios;
3. If you are interesting in discounts for corporate client you have to enter into 3D agreement between Agent, S7 and corporate client;
As a result Agent ID and Client ID will be defined in 3D agreement. They are required to execute scenarios with 3D Agreement.
4. Once all the documents have been completed, your account manager will notify you when you can proceed to the production environment.
Step 6: Access to production environment
Create a new certificate for production environment (similar as for test environment but the new one — check Step 2 for more details):
- Create private key;
- Create a request for SSL certificate;
- Fill in the details of the request for SSL certificate;
- Create a new task with the request of SSL certificate (request_csr) by JIRA;
- Receive credentials for production environment from our technical support:
- a SSL certificate (*.crt file);
- personal credentials for basic authentication (login and password);
- access parameters for requests (XML block Party);
- Client ID and Agent ID (only If you are entered into 3D agreement)
- Import SSL certificate and create key store file;
Step 7: Maintenance
1. Choose one of available and tested versions at production environment at the top of the page;
2. Use header's parameters for tested selected version (If the parameter is not defined, the last version will be used by default):
3. Try to use read operations to check the correctness of your first bookings (read operation) and issued tickets (retrieveTicket operation).
Avoid making mistakes in the production environment due to the penalties specified in the signed contract!
If you are still not sure, don't hesitate to reach our technical support by JIRA
4. Don't forget to check our updates!
- Release Notes | S7 Agent API for new versions of S7 Agent API;
- FAQ | S7 Agent API for most common issues you can be faced with.
If you still have any questions, try to find an answer using our FAQ | S7 Agent API and documentation or ask for technical support by JIRA or email at api.support@s7.ru