Steps
- Application for connection.
All information required for connection — in one application - Access to the test environment.
Get access to the test environment and integrate under the supervision of S7 technicians - Running test scripts.
Test the S7 Agent API to prevent future problems - Signing of the contract of EDS.
Sign the contract electronically - Accessing the production area.
Complete integration and use the capabilities of the S7 Agent API 7 days after completing the application
Note
- Target period 7 working days
- 99.7% accessibility
- Technical support by JIRA and email at api.support@s7.ru
- Documentation with examples
- FAQ
Environment
Test
- Endpoint: https://qa-gaia.s7.ru/agent-api/gaia
- WSDL v0.21: https://qa-gaia.s7.ru/agent-api/wsdl/0.21?wsdl
- WSDL v0.35: https://qa-gaia.s7.ru/agent-api/wsdl/0.35?wsdl
Production
- Endpoint: https://api.s7.ru/agent-api/gaia
- WSDL v0.21: https://api.s7.ru/agent-api/wsdl/0.21?wsdl
- WSDL v0.35: https://api.s7.ru/agent-api/wsdl/0.35?wsdl
Step 1: Application for connection.
- Fill and send an application from
 Откуда, куда и как?
 - Request access to JIRA зачем? Нельзя по заявке это делать?
- Create a JIRA task for аccess to the test environment зачем? Нельзя по заявке это делать?
Step 2: Access to the test environment.
1. Check your environment for OpenSSL and install additional software
OpenSSL is required to create an SSL certificate
- For Windows/Solaris
Download the last binary version of OpenSSL at https://www.openssl.org/community/binaries.html and setup
- For GNU/Linux
sudo apt install openssl
- For MacOS
No action is required — already included in OS
2. Check your environment for JDK version 7 or 8 and install additional software
JDK includes keytool which is required to create an SSL certificate ![]() Зачем? Это ведь не требуется для последних версий SoapUI
Зачем? Это ведь не требуется для последних версий SoapUI
Download the last version of JDK at http://www.oracle.com/technetwork/java/javase/downloads/index.html and setup
2. Create an SSL certificate for the test environment and configure your software
3. Import certificate and check availability of actual API version.
Download and setup OpenSSL.
The last binary version for Windows/Solaris can be downloaded at:
https://www.openssl.org/community/binaries.htmlFor GNU/Linux:
- Download and setup JDK version 7 or 8.
To convert the certificate, use the keytool included in the JDK:http://www.oracle.com/technetwork/java/javase/downloads/index.html
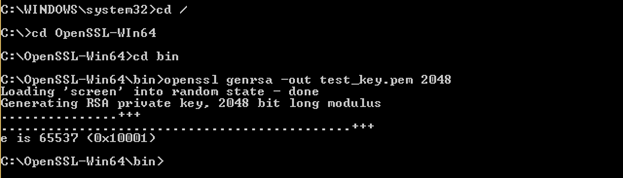
Use command line (administrator) create private key and request on SSL certificate.
Create private key:
openssl genrsa -out ${clientkey}.pem 2048
Create request on SSL certificate
openssl req -new -key ${clientkey}.pem -out ${clientcsr}.pem
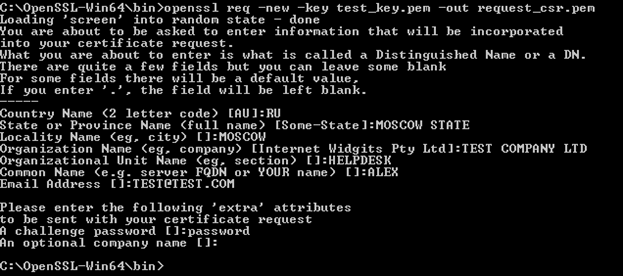
Select their name for ${clientkey}, ${clientcsr} .
Enter information about:
- Country Name (2 letter code)
- State or Province Name
- Locality Name (eg, city)
- Organization Name (eg, company)
- Organizational Unit Name (eg, section)
- Common Name (your name or server's hostname)
No need to specify:
- A challenge password
- An optional company name
 Check “Bin” (OpenSSL) folder where there will be the private key (test_key) and request on SSL certificate (request_csr).
Send to api.support@s7.ru request on SSL certificate (request_csr)
After receiving the certificate from api.support@s7.ru start the import.
Import SSL certificate
openssl pkcs12 -export -in ${clientcert}.pem -inkey ${clientkey}.pem -out ${client}.p12 -name "${name}"
 Export Password – key for test.p12
 Import to browser:
Mozilla Firefox > Menu > Preferences > Advanced > ViewCertificates > Your Certificates > Import > Выберите ${client}.p12
Google Chrome > Settings > Advanced Settings > HTTPS/SSL > Import > Выберите ${client}.p12Conversion SSL certificate with use JDK
Conversion SSL certificate
keytool -importkeystore -srckeystore ${client}.p12 -destkeystore ${client}.jks -srcstoretype PKCS12 -deststoretype JKS -deststorepass ${password} -srcstorepass ${password}

Attention
deststorepass ${password} and srcstorepass ${password} should be identical.
After the command we get the file — test.jks - Open — SoapUI > File > Preferences > SSL Setting
Specify the path to the file jks and choose «requires client authentication».

Step 3: Running test scripts.
- Check API documentation
Step 4: Signing of the contract of EDS.
Step 5: Accessing the production area.
Steps
- Application for connection.
All information required for connection — in one application - Access to the test environment.
Get access to the test environment and integrate under the supervision of S7 technicians - Running test scripts.
Test the S7 Agent API to prevent future problems - Signing of the contract of EDS.
Sign the contract electronically - Accessing the production area.
Complete integration and use the capabilities of the S7 Agent API 7 days after completing the application
Note
- Target period 7 working days
- 99.7% accessibility
- Technical support by JIRA and email at api.support@s7.ru
- Documentation with examples
- FAQ
Environment
Test
- Endpoint: https://qa-gaia.s7.ru/agent-api/gaia
- WSDL v0.21: https://qa-gaia.s7.ru/agent-api/wsdl/0.21?wsdl
- WSDL v0.35: https://qa-gaia.s7.ru/agent-api/wsdl/0.35?wsdl
Production
- Endpoint: https://api.s7.ru/agent-api/gaia
- WSDL v0.21: https://api.s7.ru/agent-api/wsdl/0.21?wsdl
- WSDL v0.35: https://api.s7.ru/agent-api/wsdl/0.35?wsdl
Step 1: Application for connection.
- Fill and send an application from Откуда, куда и как?
- Request access to JIRA зачем? Нельзя по заявке это делать?
- Create a JIRA task for аccess to the test environment зачем? Нельзя по заявке это делать?
Step 2: Access to the test environment.
1. Check your environment and prepare
- For Windows/Solaris
Download the last binary version of OpenSSL at https://www.openssl.org/community/binaries.html and setup.
- For GNU/Linux
sudo apt install openssl
- For MacOS
No action is required
— already included in OS
2. Create an SSL certificate for the test environment and configure your software
3. Import certificate and check availability of actual API version.
Download and setup OpenSSL.
The last binary version for Windows/Solaris can be downloaded at:
https://www.openssl.org/community/binaries.htmlFor GNU/Linux:
- Download and setup JDK version 7 or 8.
To convert the certificate, use the keytool included in the JDK:http://www.oracle.com/technetwork/java/javase/downloads/index.html
Use command line (administrator) create private key and request on SSL certificate.
Create private key:
openssl genrsa -out ${clientkey}.pem 2048
Create request on SSL certificate
openssl req -new -key ${clientkey}.pem -out ${clientcsr}.pem
Select their name for ${clientkey}, ${clientcsr} .
Enter information about:
- Country Name (2 letter code)
- State or Province Name
- Locality Name (eg, city)
- Organization Name (eg, company)
- Organizational Unit Name (eg, section)
- Common Name (your name or server's hostname)
No need to specify:
- A challenge password
- An optional company name
Check “Bin” (OpenSSL) folder where there will be the private key (test_key) and request on SSL certificate (request_csr).Send to api.support@s7.ru request on SSL certificate (request_csr)
After receiving the certificate from api.support@s7.ru start the import.
Import SSL certificate
openssl pkcs12 -export -in ${clientcert}.pem -inkey ${clientkey}.pem -out ${client}.p12 -name "${name}"
Export Password – key for test.p12 Import to browser:
Mozilla Firefox > Menu > Preferences > Advanced > ViewCertificates > Your Certificates > Import > Выберите ${client}.p12
Google Chrome > Settings > Advanced Settings > HTTPS/SSL > Import > Выберите ${client}.p12Conversion SSL certificate with use JDK
Conversion SSL certificate
keytool -importkeystore -srckeystore ${client}.p12 -destkeystore ${client}.jks -srcstoretype PKCS12 -deststoretype JKS -deststorepass ${password} -srcstorepass ${password}
Attention
deststorepass ${password} and srcstorepass ${password} should be identical.
After the command we get the file — test.jks - Open — SoapUI > File > Preferences > SSL Setting
Specify the path to the file jks and choose «requires client authentication».
Step 3: Running test scripts.
- Check API documentation